


Description
Ultra Tile ProDeck Square Complete Wetroom System
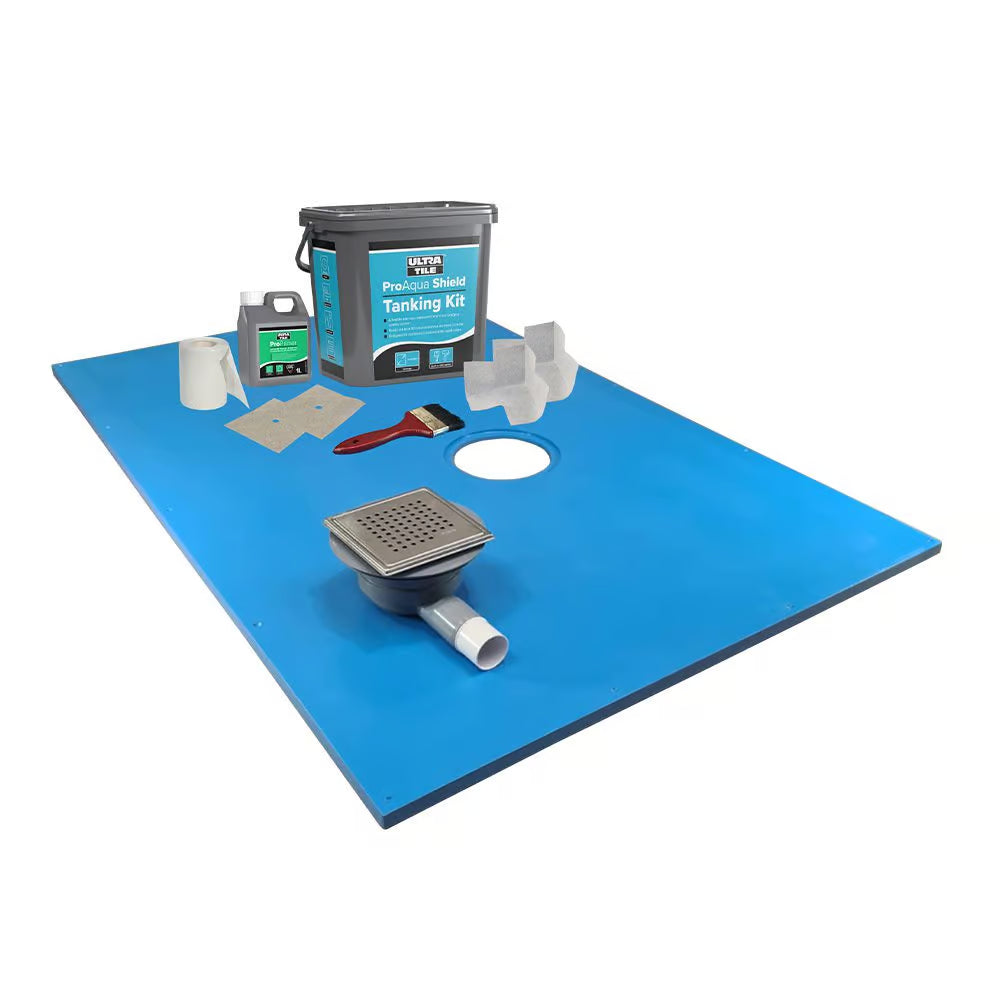
The UltraTile ProDeck Square Shower Tray Wet Room Kit is a complete wet room system comprised of a UltraTile ProDeck shower tray, drain trap kit and a waterproofing kit — available in 12 sizes to suit any wetroom project.
The ProDeck Square Shower Tray is a blue coloured self-supporting shower tray with a pre-formed minimum fall of 2% that can be used with tiles, resin, vinyl and micro-cement floor coverings. Measuring 22mm at the outer edges, it allows barrier-free installation with most timber and cement board substrates, is self-supporting and can span joists with a load bearing capacity of 470kg.
Built with reinforced fibreglass and 50% recycled material, it is 100% recyclable after use — ideal for projects with environmental requirements. It can be trimmed to size using a diamond saw.
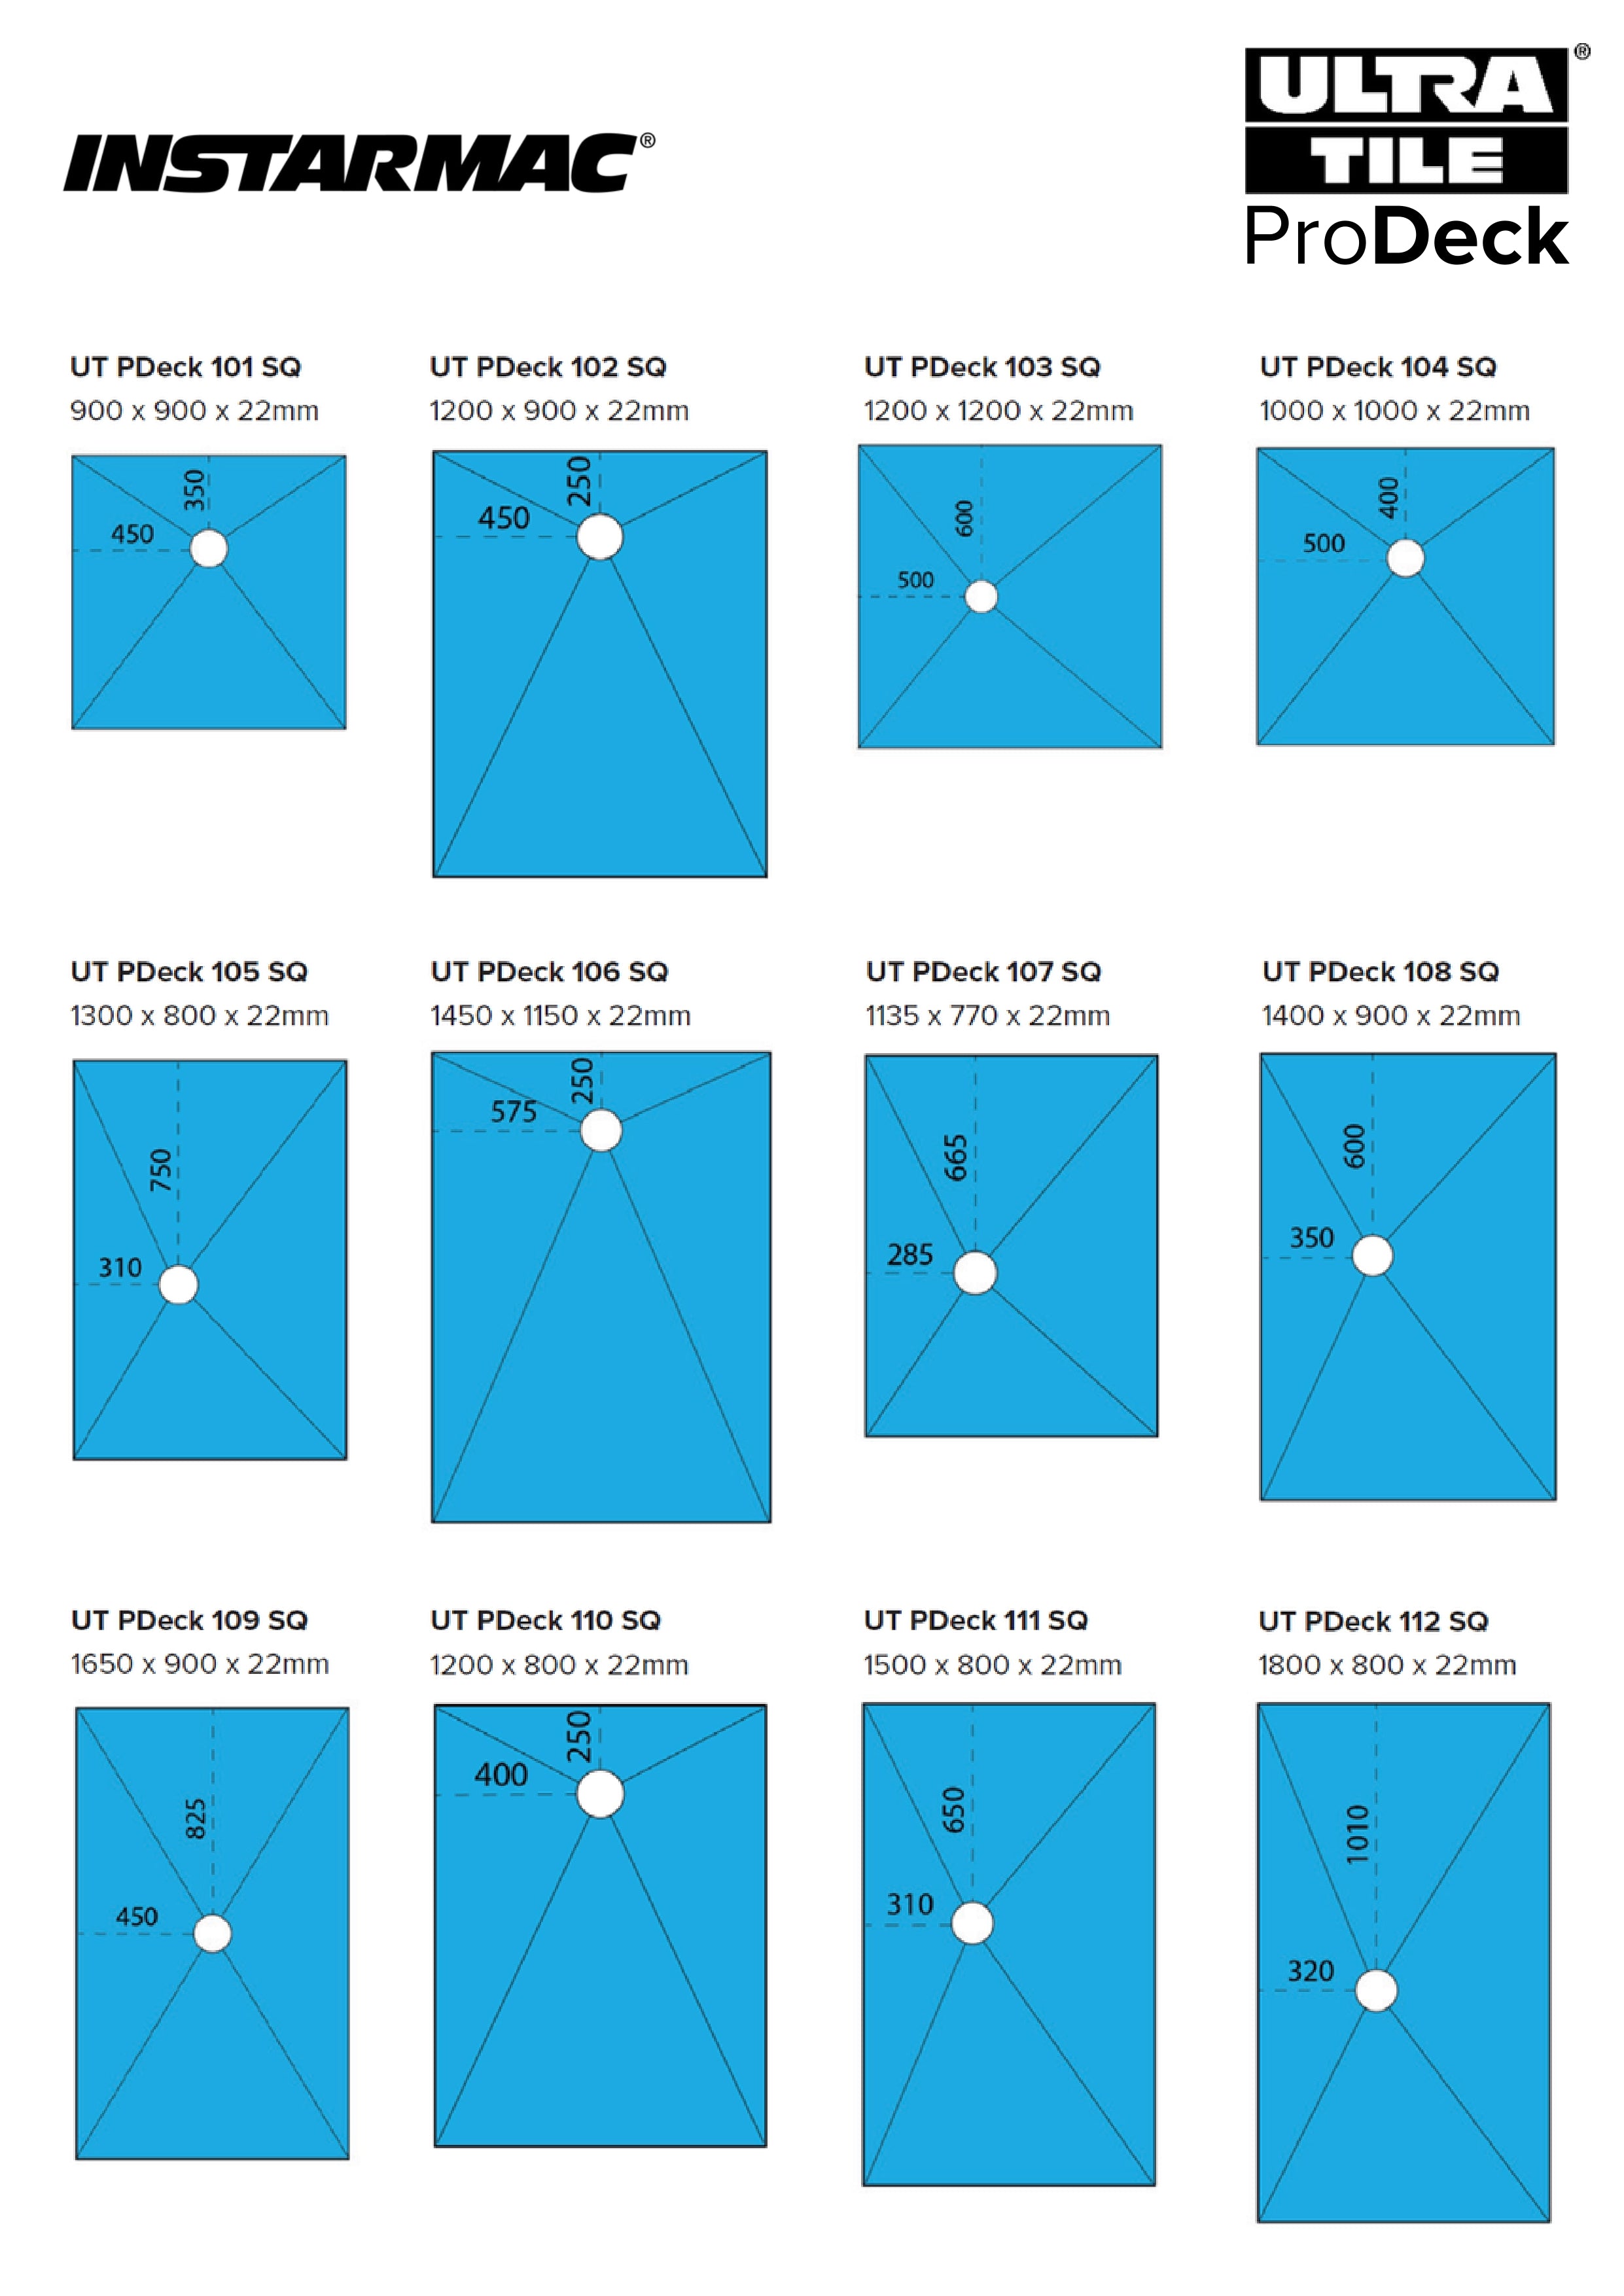
Available Sizes
- 900 x 900 x 22mm
- 1000 x 1000 x 22mm
- 1135 x 770 x 22mm
- 1200 x 800 x 22mm
- 1200 x 900 x 22mm
- 1200 x 1200 x 22mm
- 1300 x 800 x 22mm
- 1400 x 900 x 22mm
- 1450 x 1150 x 22mm
- 1500 x 800 x 22mm
- 1650 x 900 x 22mm
- 1800 x 800 x 22mm
Please note: This product is only available on a 2-3 day delivery service.
What's in the Box
- ProDeck Square Wetroom Tray (size as selected)
- 155 x 155mm Stainless Steel Square Drain Grating
- Ultra Tile ProAqua Shield Tanking Kit (covers up to 8m²)
- 1L ProPrimer
- 10m Jointing Tape
- x2 Internal Corners
- x2 Pipe Collars
- Paint Brush
ProDeck Tray Features
- Structural load-bearing — accepts 470kg loading over 400mm joist centres without deflection
- Self-supporting — no under-boarding required over 400mm joist centres
- Trimmable — can be cut to size using a diamond saw
- Composed of resin gel & reinforced fibreglass
- Manufactured using 50% recycled material & 100% recyclable
- Pre-formed minimum fall of 2%
- Compatible with tiles, resin, vinyl and micro-cement floor coverings
- 22mm depth across all sizes
Square Drain Features
- 155 x 155mm stainless steel grating supplied as standard
- High flow rate: 47 litres/minute
- Removable mechanical water trap prevents foul air from escaping
- 40mm solvent weld connection
- Two-part design for easy installation
- Optional upgrades available separately: tile-in grating (130x130mm), brushed brass, copper, bronze, or black finish
ProAqua Shield Tanking Kit
- Easy-to-use paint-on waterproofing system
- Covers up to 8m²
- Quick curing time
- Dries into a flexible waterproof membrane
Specifications
| Tray Depth | 22mm |
|---|---|
| Pre-formed Fall | Minimum 2% |
| Max Load | 470kg over 400mm joist centres |
| Drain Flow Rate | 47 litres/minute |
| Drain Connection | 40mm solvent weld |
| Standard Grating | 155 x 155mm stainless steel |
| Material | Resin gel & reinforced fibreglass (50% recycled) |
📄 Download Installation Guide (PDF)
Installation Guide
Please thoroughly read these instructions before undertaking any work. These instructions assume the wetroom has been appropriately designed and all plumbing and electrical work is to building regulations. These instructions cover the most typical level floor installations on suspended timber or solid concrete floors.
Installation on Timber Floors
- Remove the floorboards to expose the joists in the area where the ProDeck will be fitted.
- Inspect the existing joists and if in doubt, take remedial action to ensure the floor is strong and free of movement.
- If joist centres are 400mm or less, the ProDeck can be laid straight over the existing joists without under-boarding.
- If joist centres are over 400mm, install additional noggins for support.
- All edges of the ProDeck must be supported.
- Lay the ProDeck in position and consider the waste location and connection.
- Install the drain and connect the waste.
- To fix the ProDeck, pilot drill, countersink and screw down securely with appropriate wood screws.
- Check to make sure there is no movement and that the ProDeck is level.
- Use additional fixings if movement is detected. ProDeck can be screwed down anywhere on the surface, not just around the edges.
Installation on Existing Concrete Floors
- If insetting the ProDeck, the area beneath the deck must be cut and chiselled out to accommodate the deck, drain and waste pipe.
- Consider the waste pipe connection before proceeding.
- Install the drain into the ProDeck and connect the waste.
- Bed the deck down on tile adhesive or sand and cement.
- Ensure the deck is level then allow to fully dry.
- Pilot drill the deck and securely screw down.
- Check to make sure there is no movement and that the tray is level.
- Use additional fixings if movement is detected. Screw heads must be countersunk into the tray.
Depending on how the ProDeck is installed, the floor may need to be levelled to the same height as the deck — screed or tile backer boards are commonly used. Tile adhesive or 2-part filler should be used to fill any small gaps.
Tanking Instructions
Important: The entire surface of the ProDeck must be tanked before tiling. Do not tile directly onto the ProDeck without tanking first.
Tanking Overview
- Tank at minimum 1000mm up the walls and 1000mm into the room from the edge of the wet area.
- The entire surface of the ProDeck must also be tanked.
- The aim is to create one continuously tanked area.
Preparation
- Abrade the entire surface of the ProDeck to provide a key and remove contaminants. Clean the area removing all loose material and dust.
- Fill any gaps using tile adhesive or a 2-part filler and allow to dry.
- Prime the entire area to be tanked, including the ProDeck, following guidelines on the bottle.
- Install corners first, then overlap the joint tape onto them. All joints within the wet area must be covered. Bed corners, tapes and drain collar into the tanking paste.
Tanking Method
- Starting from the corner and working outwards, apply the first tanking coat with a brush or roller, painting in one direction.
- Paint the tanking onto and fully cover the entire drain gasket collar.
- Allow this coat to dry before applying a second coat in the opposite direction. Allow to dry fully.
Cleaning & Maintenance
- Lift out the NOOD water trap.
- Rinse the NOOD water trap using water only. Do not use bleach, bleach-based, caustic cleaning products or hair dye products on or in the NOOD water trap.
- Replace the NOOD water trap using two thumbs at each short end. Apply a small amount of washing-up liquid around the top rubber gasket to ease reinsertion.
Technical Helpline: 0300 1240941 | instarmac.co.uk | ultratileadhesives.co.uk