


Description
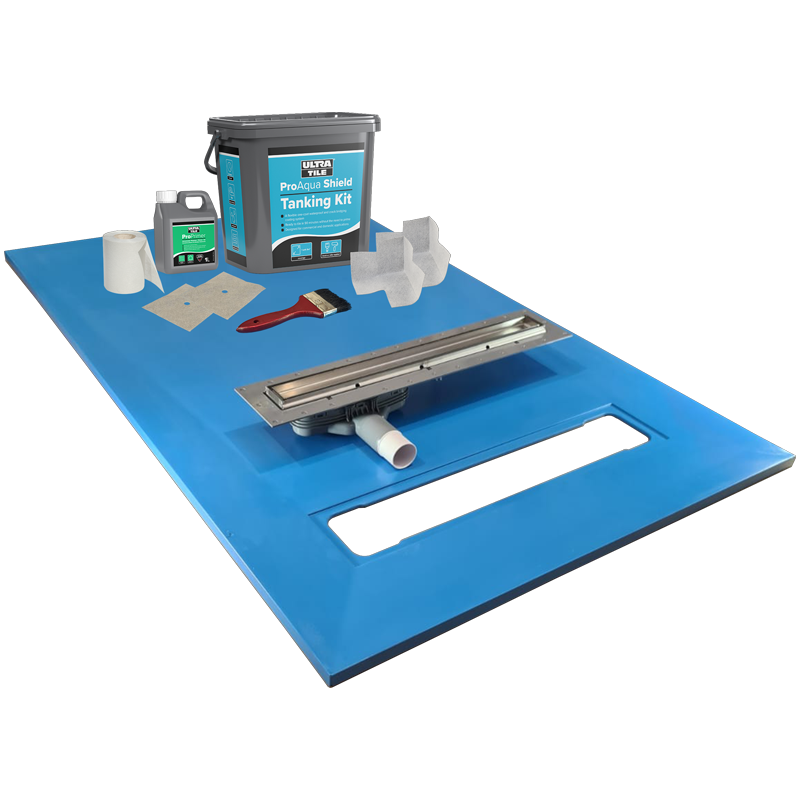
Ultra Tile ProDeck Linear Complete Wetroom System
Elevate your wetroom to the next level with the Ultra Tile ProDeck Linear. Built with reinforced fibreglass and 50% recycled material, the ProDeck is a structural, self-supporting wetroom tray that requires no under-boarding — and is 100% recyclable after use, making it ideal for projects with environmental requirements.
This complete system includes everything you need: the wetroom tray, stainless steel tile insert linear drain, ProAqua Shield tanking kit, ProPrimer, jointing tape, internal corners, pipe collars, and a brush. Ready to tile straight out of the box.
What's in the Box
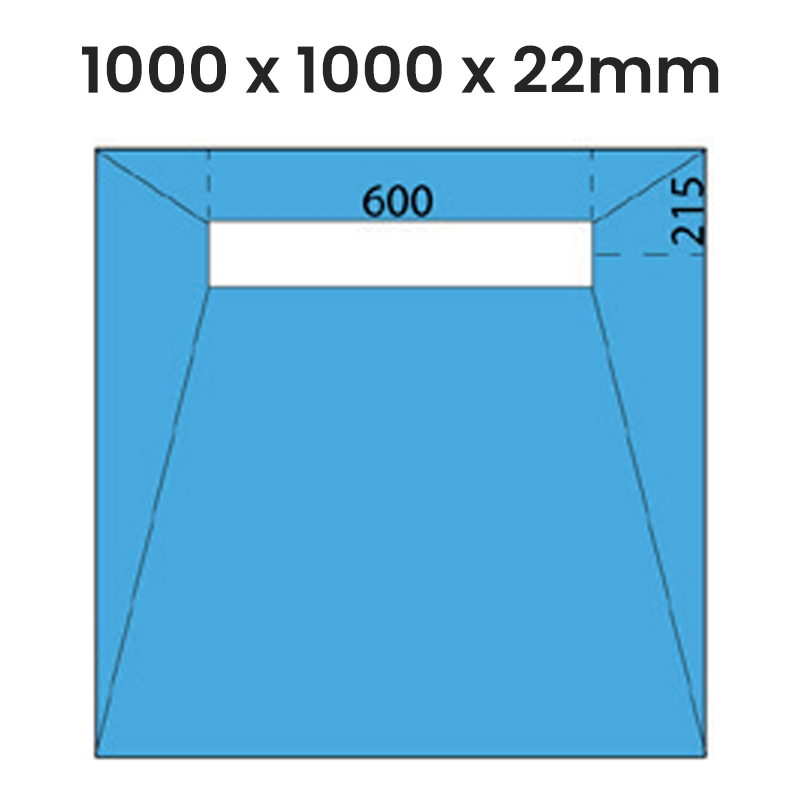
- ProDeck Linear Wetroom Tray (1000 x 1000 x 22mm)
- Stainless Steel Tile Insert Linear Drain
- Ultra Tile ProAqua Shield Tanking Kit
- 1L ProPrimer
- 10m Jointing Tape
- x2 Internal Corners
- x2 Pipe Collars
- Paint Brush
ProDeck Tray Features
- Structural load-bearing — accepts 470kg loading over 400mm joist centres without deflection
- Self-supporting — no under-boarding required over 400mm joist centres
- Trimmable — can be cut to size using a diamond saw
- Composed of resin gel & reinforced fibreglass
- Manufactured using 50% recycled material & 100% recyclable
Linear Drain Features
- Stainless steel tile insert grid — accepts tiles up to 10mm thick
- High flow rate: 32 litres/minute
- Shallow gulley — projects only 74mm below the ProDeck
- Removable mechanical water trap prevents foul air from escaping
- 40mm solvent weld connection
ProAqua Shield Tanking Kit
- Easy-to-use paint-on waterproofing system
- Covers up to 8m²
- Quick curing time
- Dries into a flexible waterproof membrane
Specifications
| Dimensions | 1000 x 1000 x 22mm |
|---|---|
| Drain Position | Linear (600mm wide, 215mm from edge) |
| Max Load | 470kg over 400mm joist centres |
| Drain Flow Rate | 32 litres/minute |
| Drain Connection | 40mm solvent weld |
| Tile Insert Max Thickness | 10mm |
| Material | Resin gel & reinforced fibreglass (50% recycled) |
| Product Code | UT PDeck 201 LIN |
📄 Download Installation Guide (PDF)
Installation Guide
Please thoroughly read these instructions before undertaking any work. These instructions assume the wetroom has been appropriately designed and all plumbing and electrical work is to building regulations. These instructions cover the most typical level floor installations on suspended timber or solid concrete floors.
Installation on Timber Floors
- Remove the floorboards to expose the joists in the area where the ProDeck will be fitted.
- Inspect the existing joists and if in doubt, take remedial action to ensure the floor is strong and free of movement.
- If joist centres are 400mm or less, the ProDeck can be laid straight over the existing joists without under-boarding.
- If joist centres are over 400mm, install additional noggins for support.
- Install extra noggins around the drain slot.
- All edges of the ProDeck must be supported.
- Lay the ProDeck in position and consider the waste location and connection.
- Install the drain and connect the waste.
- To fix the ProDeck, pilot drill, countersink and screw down securely with appropriate wood screws.
- Check to make sure there is no movement and that the ProDeck is level.
- Use additional fixings if movement is detected. ProDeck can be screwed down anywhere on the surface, not just around the edges.
Installation on Existing Concrete Floors
- If insetting the ProDeck, the area beneath the deck must be cut and chiselled out to accommodate the deck, drain and waste pipe.
- Consider the waste pipe connection before proceeding.
- Install the drain into the ProDeck and connect the waste.
- Bed the deck down on tile adhesive or sand and cement.
- Ensure the deck is level then allow to fully dry.
- Pilot drill the deck and securely screw down.
- Check to make sure there is no movement and that the tray is level.
- Use additional fixings if movement is detected. Screw heads must be countersunk into the tray.
Depending on how the ProDeck is installed, the floor may need to be levelled to the same height as the deck — screed or tile backer boards are commonly used. Tile adhesive or 2-part filler should be used to fill any small gaps.
Installing the Linear Drain
Waste connections can be made in the following ways:
- Access from below.
- Connecting a length of pipe to the trap to enable final connection outside the deck area.
The drain body is set into the rebate from the top of the ProDeck (the side with the slopes) and fixed using the clamping frame on the underside, bolted through. Space bolts evenly around the drain body. Pilot drill through the drain body and ProDeck and bolt through. Do not use power tools and do not over tighten.
The Tile Insert grate is designed for use with 10mm tiles. Tile up to the drain frame, which will leave space for a grout line.
Tanking Instructions
Important: The entire surface of the ProDeck must be tanked before tiling. Do not tile directly onto the ProDeck without tanking first.
Tanking Overview
- Tank at minimum 1000mm up the walls and 1000mm into the room from the edge of the wet area.
- The entire surface of the ProDeck must also be tanked.
- The aim is to create one continuously tanked area.
- Areas outside the main wet space that are exposed frequently to water must also be tanked.
Preparation
- Abrade the entire surface of the ProDeck to provide a key and remove contaminants. Clean the area removing all loose material and dust (sandpaper included).
- Fill any gaps using tile adhesive or a 2-part filler and allow to dry.
- Prime the entire area to be tanked, including the ProDeck, following guidelines on the bottle.
- Install corners first, then overlap the joint tape onto them. All joints within the wet area must be covered. Bed corners, tapes and drain collar into the tanking paste.
Tanking Method
- Starting from the corner and working outwards, apply the first tanking coat with a brush or roller, painting in one direction.
- Paint the tanking onto and fully cover the entire drain gasket collar.
- Allow this coat to dry before applying a second coat in the opposite direction. Allow to dry fully.
The white drain collar is laid over the top of the drain and tanked in between both coats of tanking.
Important Notes
- Ensure the ProDeck is secure with no movement and installed level.
- The entire ProDeck must be tanked.
- Tile adhesive should be flexible bag powder type S1 or S2, suitable for use in wet areas.
Cleaning & Maintenance
These cleaning and maintenance instructions must be handed to the client upon completion.
- Lift out the NOOD water trap.
- Rinse the NOOD water trap using water only. Hold the spring-loaded body fully open whilst rinsing. Use only water and, if required, a small brush. Do not use bleach, bleach-based, caustic cleaning products or hair dye products on or in the NOOD water trap. If bleach or deblocker must be used in the pipework, remove the NOOD first and pour directly into the pipework.
- Replace the NOOD water trap using two thumbs at each short end. Apply a small amount of washing-up liquid around the top rubber gasket to ease reinsertion. Ensure the gasket is fully inserted and watertight.
If you have a blockage in the waste pipe system, remove the NOOD before rectifying or cleaning.
Technical Helpline: 0300 1240941 | instarmac.co.uk | ultratileadhesives.co.uk